How to Fix Bad Lighting in Videos Using AI: Capcut Relight
Bad lighting has a special talent for making you look like you’re filming in a witness protection program.
You set up your camera. You hit record. You feel optimistic. Then you watch the clip back and realize your overhead light has turned you into a shiny forehead ghost, the window behind you has blown out the entire background, and your face is doing that “half in shadow, half in daylight” thing that screams low-budget documentary.
Here’s the good news: you don’t have to reshoot. And you don’t need a ring light the size of a hula hoop living permanently in your living room. If you edit in CapCut, you can fix a lot of lighting problems using Relight AI, which is designed to brighten faces, rebalance shadows, and make your video look more evenly lit with a few taps.
As an affiliate partner of various brands and sponsored content, we may earn commission on qualifying purchases. Disclaimer | Advertise With Us
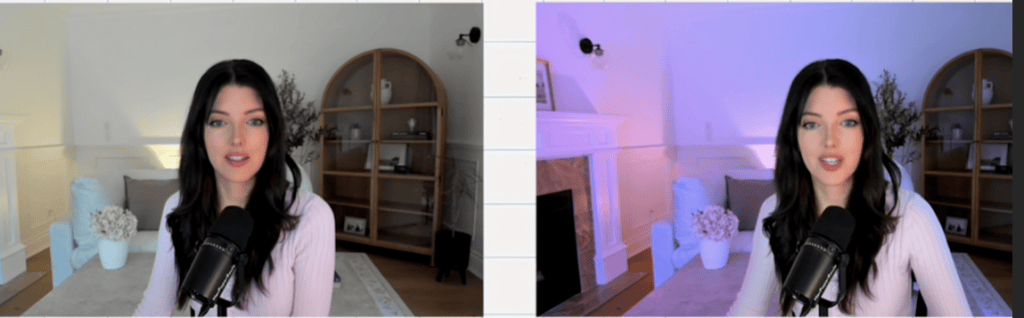
How to Fix Bad Lighting in Videos Using AI: Capcut Relight Tutorial
This video walks you through how to use CapCut’s Relight AI feature to improve bad lighting in videos, what it can fix, and how to avoid pushing it so far that you look like you’ve been FaceTuned by a futuristic robot with trust issues.
Try CapCut Pro for Free
Capcut Pro Free Trial Coupon – For a Limited Time!
What “bad lighting” usually means (and why it happens)
Most lighting issues aren’t because you did something “wrong.” They happen because cameras are picky. If the light source is behind you, the camera exposes for the bright background and your face goes dark.
If the light is harsh from above, it creates deep shadows under your eyes and nose.
If the room is dim, your camera boosts exposure and you get grainy footage. If you mixed warm and cool lights, your skin tone can shift into strange territory.
Relight AI helps because it’s not just boosting brightness across the entire clip. It’s attempting to intelligently adjust the lighting on the subject so your face looks clearer and more balanced.
Think of it as “virtual lighting” applied in editing, instead of trying to wrestle your room lighting into submission.
Where to find Relight AI in CapCut
Open CapCut and import your video into a new project. Tap your clip on the timeline so the editing controls appear.

Note, Relight is a pro feature. Get a free trial of CapCut Pro.
From there, look for the menu options that relate to video adjustments or effects and locate Relight (often labeled as an AI tool). CapCut’s layout changes occasionally, but Relight AI is typically grouped with other enhancement features.
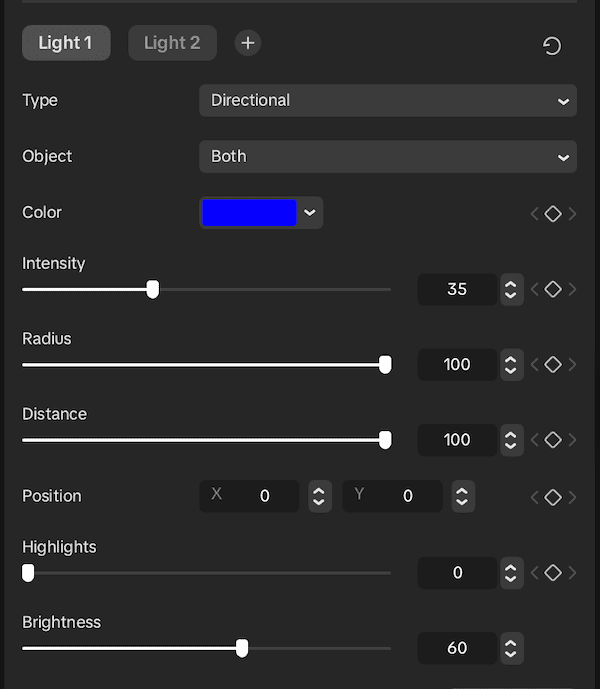
Once you select Relight, CapCut will apply an AI lighting pass to your clip. You’ll usually see intensity controls or presets that let you decide how strong the effect should be.
How to use Relight AI to fix your lighting
Start by applying Relight AI at a low intensity. This is the part most people skip because they’re excited, and then they crank it to 100 and wonder why their face looks like it’s glowing in a paranormal romance cover.
After you apply the effect, watch your clip from the beginning and pay attention to three areas: your face, your background, and the edges around your hair and shoulders.
A good Relight adjustment should make your facial features clearer without bleaching your skin tone or flattening all natural shadows. You still want dimension, just not “lost in a cave” darkness.
If your video is backlit, Relight AI is especially helpful. It can lift the shadows without completely destroying the rest of the exposure. If your lighting is uneven, it can soften harsh contrast so the clip feels more consistent.
When Relight AI works best (and when it won’t)
Relight AI works best on footage where the subject is clearly visible but underexposed or unevenly lit. It’s great for talking-head videos, product demos, and clips where you’re the main focus.
It won’t perform miracles if the clip is extremely dark, extremely overexposed, or so grainy that the details are already gone.
AI can enhance what exists, but it can’t fully recreate information your camera never captured. In those cases, you may still improve things, but you’ll get the best results by combining Relight with basic adjustments like exposure, contrast, highlights, and shadows.
How to keep the result looking natural
The best-looking edits are the ones nobody notices. After applying Relight AI, take a moment to compare the “before” and “after.” If your face is brighter but the background now looks strange, dial it back.
If your skin tone shifted, adjust color temperature or tint slightly to bring it back to normal. If the clip looks too sharp or too processed, subtlety is your friend. A small improvement that looks real is better than a big improvement that looks artificial.
Also, if you’re editing multiple clips for the same video, try to keep the Relight intensity consistent. Nothing breaks immersion faster than your lighting changing drastically every time you cut to a new angle.
The real win: you stop reshooting everything
The reason this feature is such a game-changer is that it saves you from the “I’ll just film it again” spiral. You know the one.
You reshoot because the lighting is bad. Then you reshoot because the audio is weird.
Then you reshoot because your hair did something disrespectful. Suddenly you’ve spent two hours chasing a perfect take instead of publishing.
Relight AI gives you a practical shortcut. It won’t replace good lighting forever, but it will rescue clips that are otherwise totally usable, and it lets you create consistently better-looking videos without upgrading your entire setup.
If you want the full walkthrough, including exactly where the feature is, what settings I use, and how to avoid the most common “overcooked AI lighting” look, watch my CapCut Relight AI tutorial.
Once you see it in action, you’ll start treating bad lighting as an editing problem instead of a reason to start over.
Watch this next: How to Put Text Behind a Person in a Video.